Sunset & Golden Hour Masterclass
Why It Matters
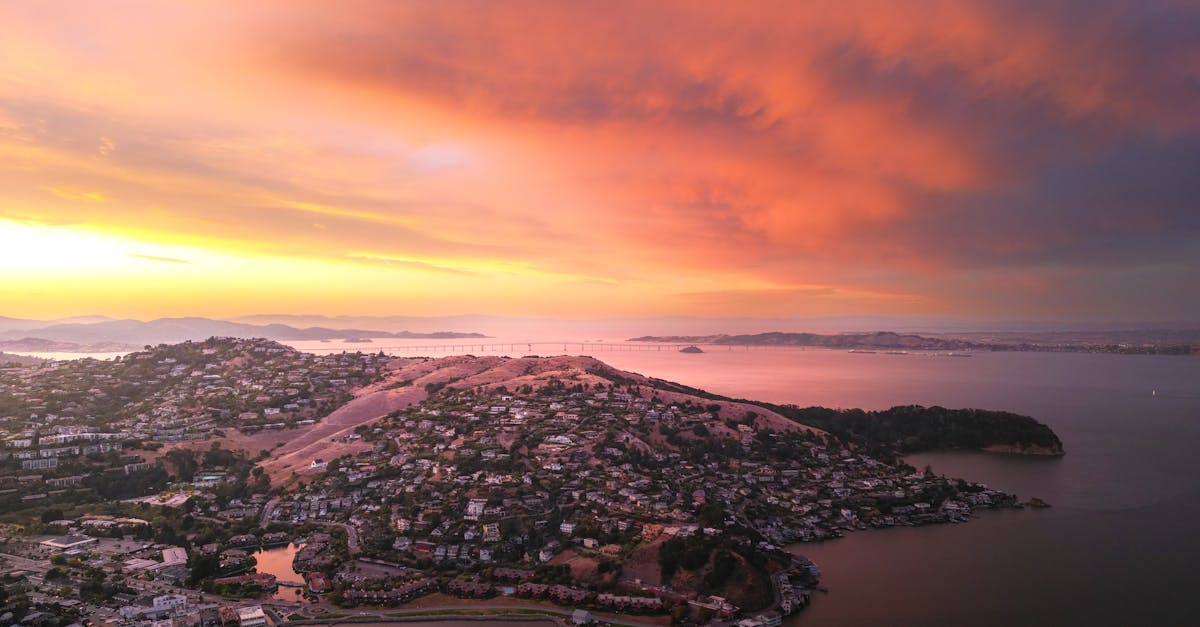
Golden hour turns ordinary locations into something special. That 30-60 minute window before sunset covers everything in warm, directional light that creates long shadows, rich colors, and a three-dimensional quality you cannot get at midday. For drone photography, golden hour is the most productive time to fly.
Golden hour is also the most technically challenging time to shoot. The light changes every minute, dynamic range is extreme, and you have a narrow window to get the shot. This lesson gives you a system.
The Three Types of Sunset Shots
Not all sunset shots are the same. Each captures a different quality of the golden hour:
Shot 1: The Golden Glow (Before Sunset)
The sun is still above the horizon, casting warm golden light across the landscape. Everything is bathed in amber. Shadows are long and dramatic.
- Technique: simple forward flight or static shot. The golden light does the work.
- Settings: aperture priority or manual at f/8-f/11, ISO 100, shutter to balance exposure
- Best for: landscapes with texture (orchards, fields, rolling hills, forests)
- Duration: this golden quality lasts only 15-20 minutes
Shot 2: The After-Sunset Sky (Just After Sun Disappears)
The sun has gone below the horizon but the sky lights up with color: pinks, oranges, crimsons, and purples. This is often more dramatic than the actual sunset.
- Technique: start high, then descend toward the landscape to emphasize the sky
- Settings: continually adjust. Light is fading fast. Increase ISO to 200-400 if needed.
- Best for: coastal scenes, silhouetted landscapes, city skylines against a colorful sky
- Duration: 10-15 minutes of peak color
Shot 3: The Droney (Self-Reveal)
Start with the camera facing you (or a subject) close-up, then fly backwards and upward to reveal the landscape. This works at any time but produces particularly strong results during golden hour.
- Technique: start low and close, fly backwards while climbing, ending with a wide landscape reveal
- Settings: set exposure for the brightest frame (when sky is visible) and let shadows fall where they may
- Best for: remote locations, dramatic landscapes, creating a sense of scale
Get to your location at least 30 minutes before sunset. Test your shot compositions and camera settings while the light is still ordinary. When that golden moment arrives, you’ll be ready. If you’re still figuring out your settings when the light peaks, you’ll miss it.
Camera Settings That Change With the Light
Golden hour settings are not static. They shift as the light fades:
| Time Relative to Sunset | ISO | Shutter Speed | Notes |
|---|---|---|---|
| 30 min before | 100 | 1/500-1/1000s | Plenty of light |
| 15 min before | 100 | 1/250-1/500s | Golden quality at its peak |
| At sunset | 100-200 | 1/125-1/250s | Light dropping fast |
| 10 min after | 200-400 | 1/60-1/125s | Sky still colorful, ground dark |
| 20 min after | 400-800 | 1/30-1/60s | Entering blue hour |
The Constant: Keep ISO Low, Adjust Shutter
Let shutter speed absorb the light changes. Only increase ISO when shutter speed drops too low for sharp photos (below 1/60s is risky for handheld drone shots). Use AEB bracketing to capture the full dynamic range at every stage.
Planning Your Sunset Shoot
A successful sunset shoot requires planning:
- Scout the location on Google Maps: check accessibility, hazards, and flight paths
- Check safe distances: stay clear of roads, people, and buildings
- Check sun position: use an app to know exactly where the sun will set on the horizon
- Plan timing: arrive 30 minutes early to set up and test shots
- Send the drone up early: test camera settings against the brightest part of the sky
- Shoot multiple passes: light changes every minute, so repeat your best compositions
Shoot facing away from the sun, staying within a 180-degree arc with the sun behind you. The sun illuminates your subjects from behind the camera. Shooting toward the sun creates lens flare, overexposure, and silhouette effects you may not be able to fix. Save sun-toward shots for deliberate silhouettes only.
Editing Sunset Photos in Lightroom
Sunset photos need specific editing:
Step 1: Set White Balance
Sunset light is already warm. Do not fight it. Set temperature slightly warmer than the “correct” value to enhance the golden quality.
Step 2: Recover Dynamic Range
Sunset scenes have extreme dynamic range: bright sky, dark ground.
- Highlights -50 to -80: recover sky color and detail
- Shadows +30 to +60: reveal ground detail
- Use a graduated filter on the sky to darken it separately from the ground
Step 3: Enhance Color
- Vibrance +15-25: boost the warm tones without oversaturating
- Dehaze +10-20: intensifies sunset colors dramatically
- Consider targeted color adjustments: boost orange and red luminance for glowing skies
Step 4: Add Punch
- Clarity +10-15: adds definition to clouds and landscape textures
- S-curve on tone curve: deepens shadows and brightens highlights for drama
HDR Merge for Sunsets
If you shot AEB (which you should), merge the brackets first. The HDR image will have sky detail and ground detail that a single exposure cannot capture. Then apply the editing steps above to the HDR file.
Quick Check
Q: What are the three types of sunset shots? A: (1) The Golden Glow: sun still up, warm light across the landscape; (2) After-Sunset Sky: sun gone, sky lit with color; (3) The Droney: close-up to wide reveal showing scale.
Q: Why should you arrive 30 minutes early for a sunset shoot? A: To scout compositions and test camera settings while the light is still ordinary. The golden quality lasts only 15-20 minutes, so you need to be ready when it peaks.
Q: What’s the most important Lightroom adjustment for sunset photos? A: Highlights recovery (-50 to -80). This brings back sky color and detail that would otherwise be blown out.
What’s Next?
Golden hour mastered. Now let’s explore a completely different approach: removing color entirely.
Pilot Institute: chase the light.