Hyperlapses & Time-Lapses
Why It Matters
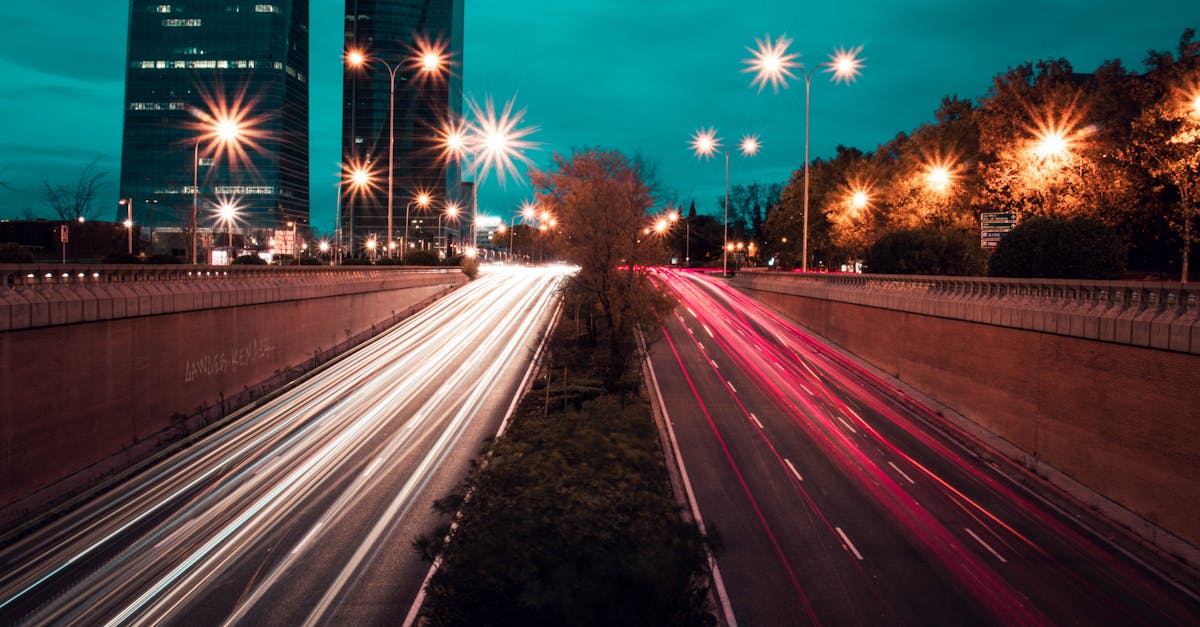
A time-lapse compresses time. Clouds race across the sky, shadows sweep across the ground, and traffic flows like blood through arteries. A hyperlapse is a time-lapse in motion: the camera moves through space while time accelerates. The result is footage that looks like the world is fast-forwarding around you. No other technique creates this effect, and it’s one of the most impressive shots in drone videography.
How Hyperlapses Work
A hyperlapse is a sequence of still photographs taken at regular intervals while the drone moves. The photos are stitched together into video, typically at 24 or 30 frames per second. Because each frame is a high-resolution still photo (not a video frame), the quality is exceptional.
The “moving” part is what distinguishes a hyperlapse from a time-lapse. In a time-lapse, the camera stays still. In a hyperlapse, the camera travels a path: forward, backward, in a circle, or along waypoints.
The math: If your interval is 2 seconds and you want a 10-second final video at 24fps, the drone needs to capture 240 photos (10 seconds × 24 fps). At 2-second intervals, that takes 480 seconds (8 minutes) of shooting time.
The Four DJI Hyperlapse Modes
Most modern DJI drones (Mavic 2 Pro, Mavic 3, Air series, Mini 3/4 Pro) offer four hyperlapse modes:
1. Free Mode
You control the drone manually while it takes photos at the set interval. You can fly forward, backward, sideways, up, or down. The choice is yours.
When to use: When you want complete creative control over the flight path. Best for experienced pilots who can maintain smooth, consistent movement over several minutes.
The challenge: You must fly smoothly for the entire duration (often 5–10 minutes). Any twitch or change in speed creates a visible jump in the final video.
2. Course Lock
The drone flies in one direction (forward, backward, left, or right) at a constant speed. You choose the direction and speed, and the drone maintains it.
When to use: The most reliable mode for beginners. Set the direction, set the speed, and the drone handles consistency. Perfect for fly-bys and forward-motion hyperlapses.
Settings to use:
- Interval: 2 seconds (the standard, gives enough time between frames for clean stitching)
- Video length: 10–15 seconds (short enough to keep the viewer engaged)
- Speed: 1–2.5 mph (slow enough for smooth motion)
3. Circle
The drone orbits around a point of interest while taking photos. Choose the center point and radius.
When to use: Orbiting a building, monument, or landscape feature. Creates a spinning time-lapse effect. The subject stays centered while the world rotates around it and time accelerates.
4. Waypoints
You set multiple GPS waypoints, and the drone flies between them on a predefined path. The most customizable mode.
When to use: Complex paths like flying around a building, following a road, or navigating between obstacles. Waypoints let you plan the exact route before the hyperlapse begins.
In your drone’s hyperlapse settings, enable “Save Original Photos” (sometimes called “Save RAW files”). This gives you the full-resolution still photos in addition to the auto-generated video. You can then edit the RAW photos in Lightroom or similar software for much better color and quality, and assemble the sequence manually in DaVinci Resolve or After Effects. The auto-generated video is convenient, but manual processing from RAW produces superior results.
Hyperlapse Settings Guide
| Setting | Recommended Value | Why |
|---|---|---|
| Interval | 2 seconds | Standard for smooth motion. Shorter intervals (1s) create smoother motion but require more photos and shooting time. |
| Video length | 10–15 seconds | Long enough to show meaningful time passage, short enough to hold attention. |
| Speed | 1–2.5 mph | Slow movement creates the smoothest hyperlapses. Faster speeds create choppier results. |
| Shoot during | Golden hour, blue hour, cloudy days | Moving clouds are the most compelling hyperlapse subjects. Clear blue sky produces boring hyperlapses. |
What Makes a Great Hyperlapse
Clouds Are Essential
The most compelling hyperlapses show clouds racing across the sky. Without visible cloud movement, the time-lapse effect is less dramatic. Partly cloudy days are ideal. The clouds create visible motion against the sky.
Movement in the Scene
Look for scenes with natural motion: traffic on roads, boats on water, people in public spaces, shadows from the sun. The hyperlapse should show time passing through the scene, not just the drone moving through space.
Consistent Speed
The drone must move at a perfectly consistent speed throughout the entire hyperlapse. Any speed change creates a visible acceleration or deceleration in the final video. This is why Course Lock and Waypoints modes are often more reliable than Free mode.
Battery Management
A 10-second hyperlapse at 2-second intervals requires 8+ minutes of shooting. That’s a significant portion of a battery. Check your battery level before starting. You don’t want the hyperlapse interrupted by a low battery warning. Start with at least 70% battery.
During a hyperlapse, the drone flies autonomously for several minutes. Keep your eyes on the drone itself, not the screen. Monitor for obstacles, other aircraft, or birds. The drone will move slowly but consistently. Make sure its path remains clear for the entire duration.
Manual Time-Lapses (Without Hyperlapse Mode)
If your drone doesn’t have a hyperlapse mode, or you want more control:
- Set your drone to photo mode with a timed interval (2 or 5 seconds)
- Position the drone in hover mode
- Start the interval timer
- Let the drone sit still for 10–20 minutes
- The camera captures photos at the set interval automatically
- Import the photos into editing software and assemble at 24fps
This produces a stationary time-lapse with no camera movement, just time compression. Effective for sunsets, cloud movement, and busy scenes like intersections.
Quick Check
Q: What’s the difference between a time-lapse and a hyperlapse? A: A time-lapse is stationary. The camera stays in one place while time accelerates. A hyperlapse adds camera movement, with the drone traveling through space while time-lapsing, creating a moving time-lapse effect.
Q: Why is Course Lock the best hyperlapse mode for beginners? A: The drone maintains a constant direction and speed automatically, eliminating the twitchiness that manual flying introduces. Consistent speed is the most critical factor for smooth hyperlapse results.
Q: Why should you save the original RAW photos? A: RAW files allow superior color correction and grading compared to the auto-generated video. Editing RAW photos manually in Lightroom or DaVinci Resolve produces significantly better image quality.
What’s Next?
Time and motion covered. Let’s plan entire drone video shoots with professional storyboarding.
Pilot Institute — compress time, expand impact.