Bird's Eye, Stationary & Parallax
Why It Matters
Not every shot needs forward movement. The bird’s eye view shows patterns invisible from the ground. Stationary shots capture the passage of time. The parallax pass creates three-dimensional depth from a simple lateral movement. These three shots add visual variety and prevent your video from feeling like one long forward flight.
The Bird’s Eye View
The camera points straight down (-90° gimbal angle) while the drone hovers or moves slowly. This perspective is unique to aerial platforms. No tripod, crane, or handheld camera can achieve it.
What Bird’s Eye Reveals
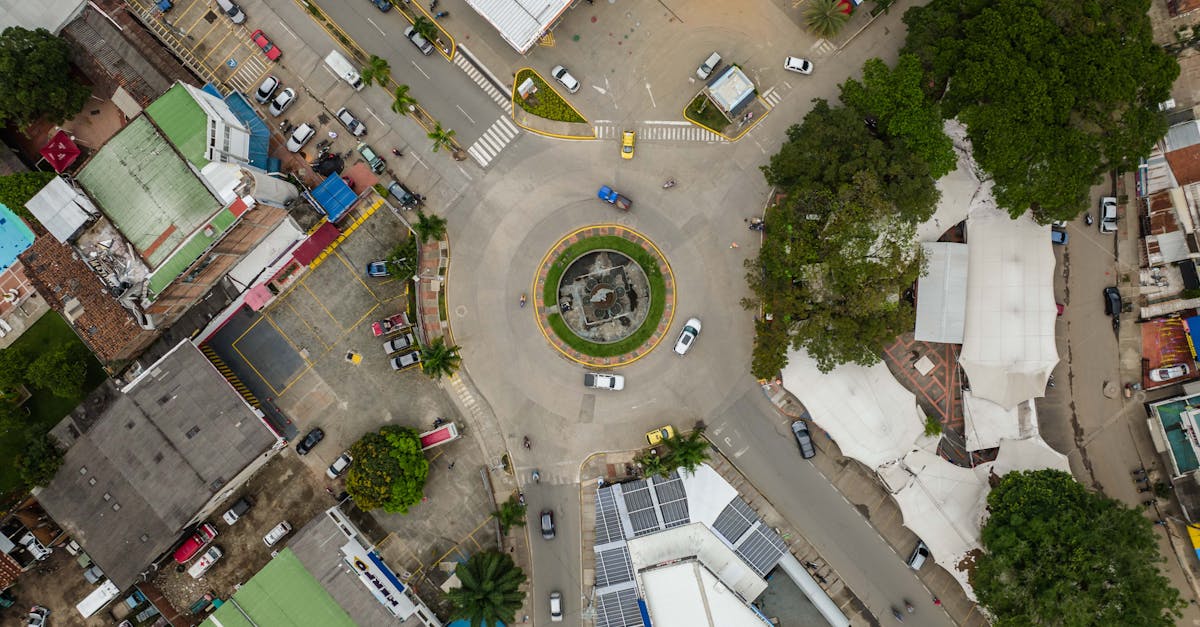
From directly above, familiar objects become abstract patterns. Roads become lines. Buildings become shapes. Rivers become curves. The viewer sees geometry instead of objects, and this shift is inherently interesting.
Best subjects for bird’s eye:
- Intersections and road networks (patterns and flow)
- Coastlines and river bends (natural curves)
- Agricultural fields (color blocks and textures)
- Sports fields and courts (geometric precision)
- Parking lots and developments (scale and organization)
- Forests and tree canopies (texture and color variation)
The Bird’s Eye with Movement
Hovering still with the camera straight down is the simplest bird’s eye shot. The movement comes from the scene itself: moving traffic, flowing water, drifting clouds.
Adding drone movement:
- Slow forward/backward — the ground scrolls beneath like a map
- Slow lateral — creates a scanning effect, as if surveying the landscape
- Slow rotation (yaw) — the scene spins around the center point, which is disorienting in large doses but powerful in short clips
The bird’s eye follow: Hover above a moving subject (car, boat, person) and follow from directly overhead. The subject becomes a dot moving through a patterned landscape. Car commercials use this shot constantly. The moment the viewer sees the road from directly above, they instinctively think “we’re not on the ground anymore.” That shift in perspective creates excitement.
A bird’s eye shot loses its impact after 3–4 seconds because the novelty wears off. Use it as a transition. A brief 2–3 second clip between forward-facing shots works well. The sudden shift from horizontal to vertical perspective creates visual punctuation.
The Stationary Shot
The drone hovers in place. The camera doesn’t move. The only motion comes from the world itself.
This sounds boring. It isn’t, when used correctly.
When Stationary Shots Work
Time-lapses: The most common use. Position the drone, hit record, wait. Clouds drift across the sky. Shadows lengthen. Traffic flows through intersections. The camera doesn’t move, but the scene changes dramatically over time.
Establishing shots with natural motion: A harbor with boats moving. A beach with waves rolling in. A city intersection with pedestrians and cars. The static camera provides stability while the scene provides life.
Subject enters and exits frame: Position the drone looking at an empty road or trail. A person or vehicle enters the frame, crosses it, and exits. The camera is still, but the movement of the subject creates the story.
How to Execute a Stationary Shot
- Position the drone where you want it
- Frame the shot
- Hit record
- Take your hands off the sticks
- Let the GPS and gimbal hold the camera steady
The most common mistake is making tiny stick adjustments during a stationary shot. These micro-adjustments create wobble that ruins the stillness. Trust the stabilization.
Wind is the enemy. Even GPS can’t hold a drone perfectly still in gusty conditions. Save stationary shots for calm days. The drone’s GPS will compensate, but wind creates subtle drift that’s visible in the footage.
For a stationary shot to work, there must be motion in the frame. You need to anticipate where that motion will happen. Frame the shot to capture the area where the action will occur. A stationary shot of an empty field with nothing moving is just a photo that wastes video storage.
The Parallax Pass
The drone flies laterally past a subject, with foreground elements passing between the camera and the subject. Different layers move at different speeds: foreground fast, subject moderate, background slow. This speed difference creates the illusion of three-dimensional depth.
Why Parallax Works
Your brain perceives depth through motion parallax. Objects closer to you appear to move faster than objects far away. When you see this in video, your brain interprets it as depth, even though the screen is flat. This is the single most effective technique for making 2D footage feel 3D.

How to Execute a Parallax Pass
- Identify your subject (building, person, vehicle, tree)
- Position the drone to the side of the subject with foreground objects between you and it (trees, rocks, fences, other buildings)
- Fly laterally past the subject. Left or right, not forward.
- The foreground elements pass through the frame quickly, the subject moves slowly, and the background barely shifts
Key principle: The closer the foreground elements are to the camera, the stronger the parallax effect. Flying at 30 feet past trees creates more depth than flying at 200 feet past the same trees.
Foreground Elements to Look For
- Trees and tree lines (the most common and effective)
- Fence posts and walls
- Buildings at the edge of the frame
- Rocks and boulders
- Waves or shorelines (when flying along a coast)
- Parked vehicles
The Fly-Through Parallax
An advanced variation: fly forward through a gap. Between two trees, through a gate, under a bridge. The foreground elements (trees, gate posts) blur past the edges of the frame while the subject ahead grows. This creates maximum depth because the foreground is extremely close to the camera.
A parallax pass only works when there are three distinct depth layers: foreground, subject, and background. If there’s no foreground, it’s just a lateral pass (flat). If there’s no background, the depth contrast disappears. Before executing a parallax pass, identify all three layers. If one is missing, find a different angle or skip the shot.
Shot Variety Strategy
The most common mistake in drone videos is using the same type of shot repeatedly. All push-ins, all orbits, or all reveals. Professional drone videographers deliberately mix shot types to maintain visual interest:
| Shot Type | Visual Effect | Energy Level |
|---|---|---|
| Push-in / pull-back | Forward momentum | Medium |
| Reveal | Surprise and awe | High (at reveal moment) |
| Orbit | 360° examination | Low-medium |
| Tracking | Following action | Medium-high |
| Bird’s eye | Abstract perspective | Medium (novelty) |
| Stationary | Passage of time | Low |
| Parallax pass | 3D depth | Medium |
Aim for a mix. No more than two consecutive shots of the same type. After a push-in, cut to an orbit. After an orbit, cut to a bird’s eye. Variety keeps the viewer engaged.
Quick Check
Q: Why should bird’s eye shots be kept short? A: The novelty of the top-down perspective wears off after 3–4 seconds. Use bird’s eye as a brief visual transition between horizontal shots.
Q: What makes a stationary shot interesting? A: Motion within the frame. Moving clouds, flowing water, passing traffic, or subjects entering and exiting. A stationary shot of a static scene is just a photograph.
Q: What three elements are required for a parallax pass? A: Foreground elements close to the camera, a subject in the middle distance, and a visible background. All three layers moving at different speeds create the 3D depth effect.
What’s Next?
Individual shots covered. Let’s combine them into multi-movement shots that create truly cinematic sequences.
Pilot Institute — variety is the key to engagement.