FPV Camera Settings & Recording
Why It Matters
Your FPV camera shows you where you’re going. The footage viewers see comes from your HD camera (a GoPro, Insta360 Go, or similar action camera mounted on your drone). These are two separate systems, and treating them that way is how you get professional-looking footage.
Most new FPV pilots are disappointed by their first HD recordings. The footage is shaky, overexposed, and disorienting. The flying might be fine, but the camera wasn’t set up correctly. The right settings and mounting make an enormous difference.
Two Cameras, Two Jobs
The FPV Camera
This is the low-latency camera that feeds video to your goggles. It prioritizes real-time response over image quality. Most FPV cameras output standard-definition video with a wide dynamic range so you can see in both bright and dark conditions.
You don’t record from your FPV camera. It’s purely for flying.
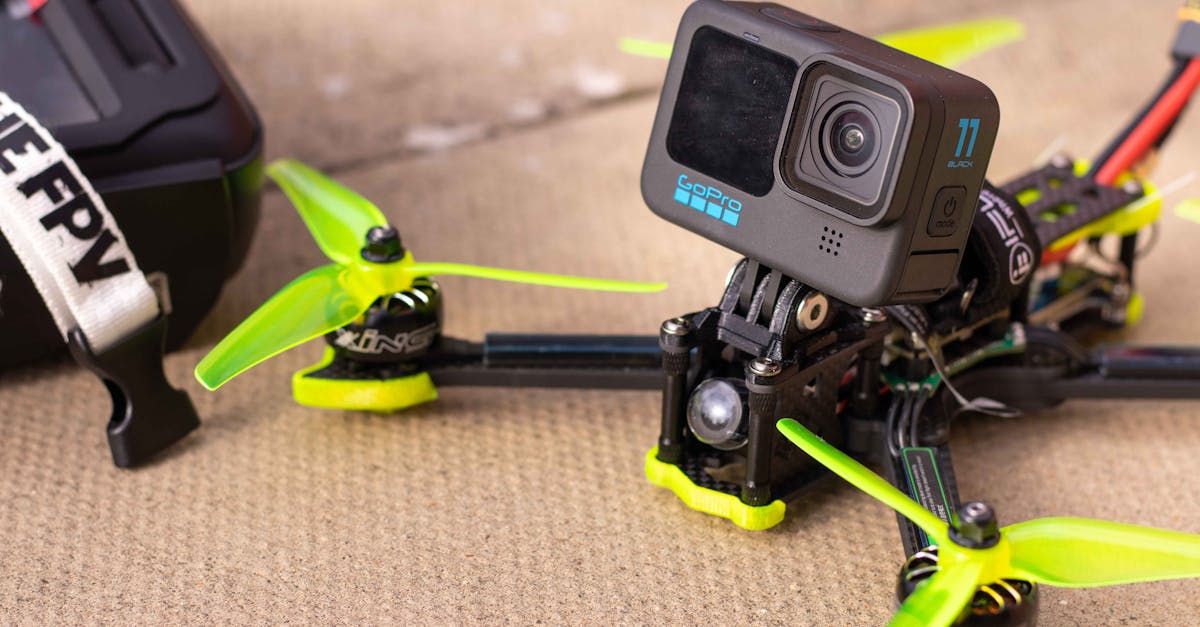
The HD Camera
This is the camera that records your final footage. It’s mounted on top or in front of your drone and records to its own internal SD card. Common choices:
- GoPro Hero (any recent model): the standard for FPV recording. Excellent stabilization (HyperSmooth), 4K capable, widely available.
- Insta360 GO 3: extremely lightweight (under 40g), mounts with a magnet. Good for micro builds where a GoPro is too heavy.
- DJI Action camera: competitive with GoPro, sometimes lighter.
- Naked GoPro: a GoPro with the screen and case removed to save weight. Popular for freestyle builds where every gram matters.
Camera Mounting
Tilt Angle
Your HD camera should be mounted at the same angle as your FPV camera (or slightly less). If the FPV camera points 15 degrees down from level, mount the HD camera at a similar angle. This ensures what you see in your goggles matches what the HD camera records.
Vibration Isolation
FPV drones vibrate. Motors spinning at 20,000+ RPM create high-frequency vibration that turns HD footage into a jiggly mess. Your camera mount needs some form of vibration damping:
- TPU (thermoplastic polyurethane) mounts: 3D-printed flexible mounts that absorb vibration. The most popular solution.
- Foam or rubber isolation: a thin layer between the camera and frame.
- Naked camera builds: removing the GoPro’s case reduces weight and allows direct mounting with isolation material.
Camera Protection
Your HD camera will eventually hit the ground. Mount it in a way that protects the lens, either recessed in the frame or with a protective guard. A scratched GoPro lens is a $300 mistake.
Camera Settings
Resolution and Frame Rate
For cinematic FPV footage, you have two main approaches:
4K at 60fps: maximum resolution with the option to slow down to 24fps for slow-motion. Gives the smoothest footage but larger files.
2.7K at 60fps or 4K at 30fps: lower data rate, still looks excellent. Good for longer sessions where storage is a concern.
Higher frame rates (120fps+) are useful for trick footage where you want dramatic slow motion, but they reduce resolution and increase file size.
Shutter Speed and ND Filters
Just like with GPS drone video, the 180-degree shutter rule applies: your shutter speed should be roughly double your frame rate for natural-looking motion blur. At 60fps, use 1/120 shutter speed. At 30fps, use 1/60.
The problem: FPV drones fly fast outdoors, so at 1/120 shutter speed, the image will be overexposed in daylight. The solution is an ND filter (sunglasses for your camera lens). ND filters reduce light entering the lens so you can use slower shutter speeds without overexposing.
For FPV with a GoPro:
- Sunny day: ND16-ND32
- Overcast: ND8-ND16
- Golden hour / low light: ND4-ND8
GoPro-compatible ND filters are available from brands like PolarPro and Freewell.
White Balance and Color
Set your GoPro or Insta360 to:
- White balance: manual (not auto). Choose 5500K for sunny conditions or use the “Native” color profile for maximum grading flexibility.
- Color profile: “Flat” or “Neutral” to preserve more dynamic range for color grading in post. The footage looks washed out straight from the camera but grades beautifully.
- ISO: lock to the lowest setting that maintains exposure. Auto ISO causes brightness fluctuations mid-clip that are hard to fix.
Post-Flight Stabilization
ReelSteady GO
ReelSteady GO (by Gyroflow) is the gold standard for FPV footage stabilization. It uses the GoPro’s internal gyroscope data to smooth out vibrations and jitters that physical mounts can’t fully eliminate.
The results are dramatic. Shaky FPV footage becomes very smooth. It’s essential for professional-looking FPV video.
Workflow:
- Record with your GoPro (gyro data is recorded automatically)
- Import footage into ReelSteady GO
- Let it analyze the gyro data and apply stabilization
- Export the stabilized footage
Gyroflow (Free Alternative)
Gyroflow is a free, open-source stabilization tool that works similarly to ReelSteady. It supports GoPro, Insta360, and other cameras. The results are comparable, and it costs nothing.
When Stabilization Helps (and When It Doesn’t)
Stabilization smooths out vibrations and small bumps. It cannot fix:
- Terribly shaky footage from extreme vibration
- Rolling shutter artifacts from very fast yaw movements
- Overexposed or underexposed footage
- Motion blur from incorrect shutter speed
Get the settings right in-camera, then use stabilization as a polish step.
Quick Check
Q: What is the purpose of the FPV camera vs the HD camera? A: The FPV camera provides real-time video for flying (goggles). The HD camera records the final footage for viewers.
Q: Why do you need ND filters for FPV camera recording? A: To reduce light entering the lens so you can use the slower shutter speeds required by the 180-degree rule without overexposing.
Q: What does ReelSteady / Gyroflow do? A: It uses the camera’s internal gyroscope data to smooth out vibrations and create stable footage in post-production.
What’s Next?
Let’s put everything together: building muscle memory, practicing tricks, creating a freestyle reel, and charting your path forward in FPV.