Shot List for Every Property
The Universal Shot List
Properties vary, but the basic shot list stays consistent. Master these six shot types and you can handle 90% of real estate jobs.
1. Establishing Shot
Purpose: Show the property in context: the house, the lot, and the surrounding neighborhood.
How to fly: Start low, near the front of the property. Rise up slowly while pushing forward or pulling back to reveal the property and its surroundings. The “reveal” is key. The viewer should feel the scale of the property unfolding.
Timing: 10-15 seconds of usable footage per take.
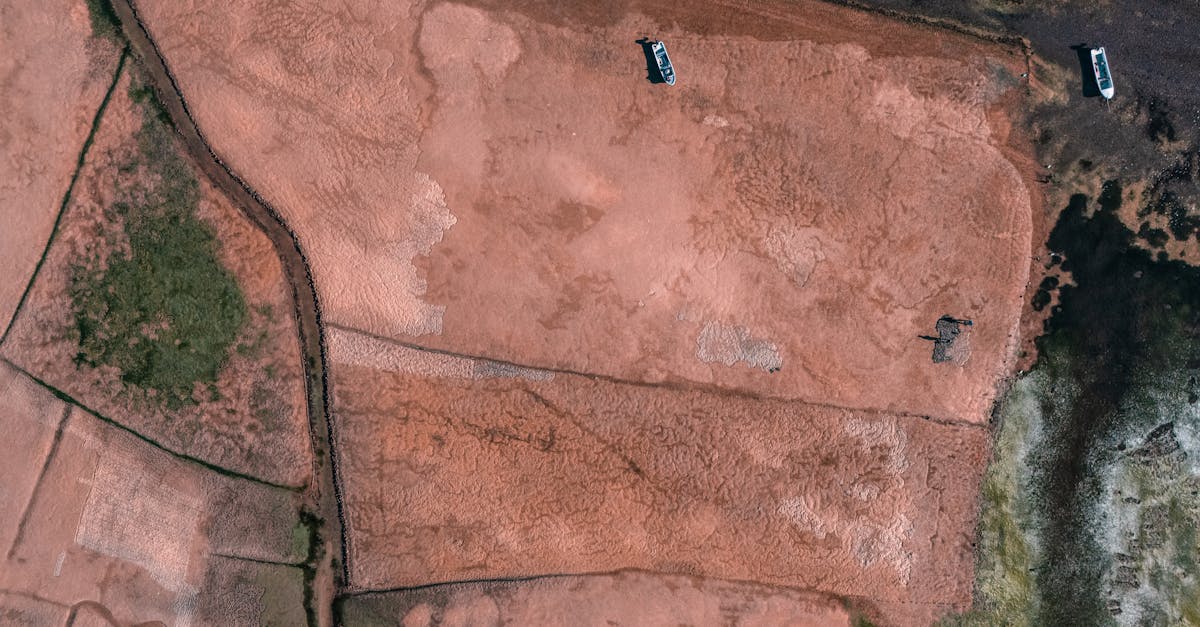
2. Bird’s Eye View (Top-Down)
Purpose: Show the property boundaries, lot size, and layout from directly above.
How to fly: Fly directly above the property. Tilt the camera straight down. Slowly pan in a full circle to show the entire lot and immediate surroundings.
The bird’s eye view is one of the most requested shots because it clearly shows lot size, landscaping, and property boundaries in a way that’s impossible from the ground. Always include it.
3. Orbit Shot
Purpose: Showcase the property from all sides with smooth motion.
How to fly: Position the drone at a 45-degree angle relative to the property. Fly in a complete circle around the house at a constant distance and altitude. Keep the camera pointed at the center of the property throughout.
Key: Slow and steady. An orbit that takes 20-30 seconds produces better results than one that takes 10 seconds.
4. Fly-Through / Gate Shot
Purpose: Create a dramatic entry point by flying through a gate, over a driveway, or along a path that leads to the house.
How to fly: Position the drone low, just above gate or path height. Fly forward slowly through the entry point and continue toward the house. The viewer experiences the approach to the property.
Works great for: Properties with dramatic driveways, gated entries, tree-lined paths, or landscaped walkways.
5. Reveal Shot
Purpose: Build anticipation by hiding the property initially, then revealing it dramatically.
How to fly: Start behind a treeline, roofline, or hill. Rise up or fly forward until the property comes into view. The reveal should happen at a natural pace.
Variant: Start facing away from the property, then yaw (rotate) slowly to reveal it.
6. Neighborhood Context
Purpose: Show what’s around the property: nearby parks, schools, waterfront, downtown skyline.
How to fly: Rise high enough to see beyond the immediate property. Pan slowly to show the neighborhood features. Keep it brief. 5-10 seconds of context is enough.
A small suburban lot doesn’t need a fly-through gate shot (there probably isn’t a gate). A rural property might benefit from a longer neighborhood context shot showing nearby amenities. Adapt the list to the property.
If you’re short on time or conditions are challenging, these three shots will cover most realtor needs:
- Establishing shot (rising reveal of the property)
- Bird’s eye view (top-down showing the lot)
- Orbit shot (cinematic circle around the house)
Everything else is bonus material. Include it when time and conditions allow.
Shot List Template
Before every property, fill this out:
- Address and sun orientation
- Establishing shot (direction to approach from)
- Bird’s eye view (altitude needed)
- Orbit shot (starting angle, number of rotations)
- Fly-through (if applicable: gate, driveway, path)
- Reveal shot (what to hide behind)
- Neighborhood context (features to show)
- Detail shots (pool, outdoor kitchen, garden, views)
Quick Check
Q: What’s the purpose of an establishing shot? A: Show the property in context (house, lot, and surrounding neighborhood), giving the viewer a sense of scale and location.
Q: Why do realtors especially love the bird’s eye view? A: It clearly shows lot size, landscaping, and property boundaries in a way that’s impossible from ground level.
Q: What are the three minimum shots for any property? A: Establishing shot, bird’s eye view, and orbit shot.
What’s Next?
Your shot list is ready. Before you take off, let’s run through the pre-flight checklist that keeps you legal and safe.
Master every shot with Pilot Institute’s professional drone training.